Free Full Size 6 Drawer Platform Bed Plans
Learn how to build a DIY total size helm'south bed with tons of visible storage drawers, but also a subconscious storage space plus tons of other features that any kid will love.

Years agone, I was a bakery and had my ain cake decorating business concern. As my boys got older and my abilities grew, their requests for more and more elaborate cakes as well grew. I mean, what child for his 4th birthday says "mommy, I want you lot to make me a Gravedigger (monster truck) cake for my altogether and I desire it to be fabricated out of modeling chocolate."??? My kids, that's who. The same goes for the projects that I build for them. They have very strong opinions well-nigh every detail and this DIY helm's storage bed was no exception. My youngest son and I spent months working through so many designs and looking for inspiration until we finally came up with this total-sized captain'southward bed with storage that you can not only encounter, but also storage you can't!
I've partnered with Rockler Woodworking and Hardware to bear witness you lot how you can build your own storage bed that will have your kids thinking you're the coolest parent ever! At to the lowest degree for a little while. When bedtime comes around and they have to close off FortNite, I'm definitely Non the absurd mom.
Lookout The YouTube Video
Purchase THE FULL-SIZE PRINTABLE PLANS
I'm going to start past saying that you shouldn't let the length of these plans intimidate y'all in the slightest. I bankrupt down all of the details of these plans to include the steps for building the pieces also as the steps for assembly. This way there'south no guesswork on your stop of where a piece should fit or what a measurement needs to be. The plans also include a total cutting listing and shopping list for your lumber and materials.
UPDATE: Y'all can now buy the plans for the twin size version of this bed.
PURCHASE THE TWIN SIZE PRINTABLE PLANS

How To Build a DIY Storage Bed:

Step ane – Milling The Lumber:
I chose to build this bed out of poplar that I milled down into dimensional lumber (1x2s and 2x2s). You can practise this, or you can simply purchase dimensional pino from Habitation Depot. I also used my circular saw to cut my plywood down into manageable sizes then finished my cuts on the tabular array saw.

Step 2 – Building the Headboard and Footboard
To build the headboard and footboard, you'll desire to drill 1 one/2″ pocket holes into the 2×2 boards and 3/four″ pocket holes into the plywood. Assemble all of the pieces with wood glue and 1 1/iv″ and 2 i/2″ pocket screws.
Step 3 – Building the Desk-bound, Nightstand, and Back up Panels
For the desk and nightstand, I ripped poplar downward to 2″ broad boards to make up the frames. This is necessary for the drawer slides to fit properly in their openings. You tin rip downward a ane×3 board if you aren't using a lumber such as poplar.
For the large plywood pieces that make up the support panels of the bed, I used my Kreg R3 pocket hole jig to drill the 3/4″ pocket holes. It'due south small size makes it easy to drill the holes into large pieces such as these.

Step iv – Build the Drawers
To build the drawers, I ripped i/ii″ plywood down into 8 1/ii″ wide strips, then cut the pieces downward to size on my miter saw. These drawers have a 1/4″ plywood bottom. I used my router to add together a 1/iv″ dado groove to the drawer pieces, so rounded off the top edges of the drawer pieces with a 1/8″ router flake. Another pick is to sand them to round them off a bit. This helps forbid whatsoever splintering of the plywood. I inserted the plywood panels, glued up the sides, and attached all of the pieces with 1″ pocket screws.

Step 5 – Build the Steps
2 of the drawers are serving as steps for my son to climb upwards onto his bed. This step is totally optional and you tin can just build regular drawers if you like. If building steps, the drawers must take three/4″ clearance on each side to accommodate the heavy duty drawer slides, so information technology is not a decision that can be made afterward the fact.
For the steps, I ripped downward a board to brand 3/iv″ foursquare dowels that deed as cleats to hold the 1/2″ plywood tread for the step. I drilled a pigsty in the plywood then that it was easily removable so the drawers can still exist used for storage. As with the drawers, I rounded off the edges of the step to prevent splintering, then sanded information technology downward smooth. Don't worry, the 1/2″ plywood is sturdy. I stood on the drawers and they held me, and so….

Step half-dozen – Build the Drawer Faces and Cabinet Doors
To build the drawer faces and cabinet doors, I used natural language and groove joinery. You tin can hands just utilize pocket joinery; however, you will still want to add a dado groove to the rails and stiles for the plywood face. The natural language and groove router fleck from Rockler was a cinch to use, though and I really loved the make clean look of the finished drawers and doors.
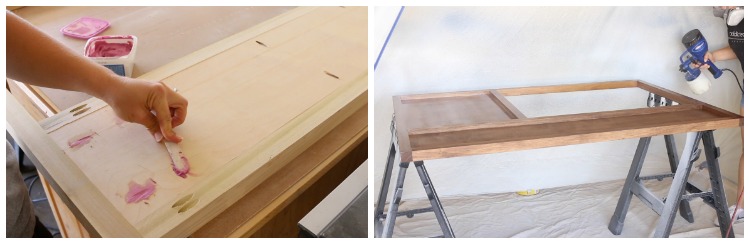
Step 7 – Finishing the Bed
The bed must exist congenital in parts, then fully assembled in it'south concluding location. This means that the staining or painting must also be done to the private parts earlier concluding assembly. Fill up any desired pocket holes with wood filler and so employ the stain or paint of your choosing to stop the bed. I stained this in Varathane Special Walnut, and then finished it off with 3-4 coats of satin polycrylic, which I practical with my paint sprayer.

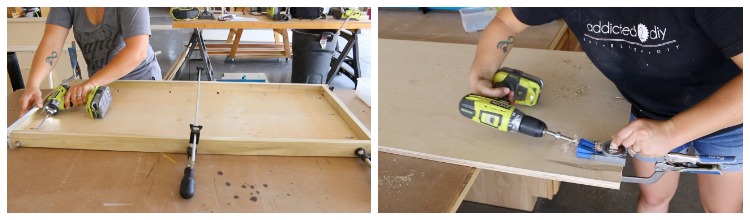
Stride 8 – Begin Assembly
Once the bed is finished and fix for assembly, bring all of the pieces within as well as diverse sizes of bar clamps (24″ to 8′). I built the face up frame later finishing all of the pieces; yet, it can be congenital prior to staining and so brought inside. Avert gluing up the bed components when assembling unless you don't ever program to have it autonomously again.
For the support panel that is fastened in the middle of the bed, 1 side is beingness fastened to the plywood on the headboard. Do not use 2 1/2″ pocket screws to attach the 2×2 to the plywood. The screws are too long and you'll stop upwardly driving them direct through the plywood (don't ask me how I know that). Instead, use ane 1/4″ pocket screws for that one end of the pinnacle 2×2 (superlative right photo).

Step 9 – Install the Drawers
Once the bed is assembled, the drawers tin can be installed. I used 100lb, 18″ side mount drawer slides for the three "regular" drawers, likewise as the desk and nightstand. I used 220lb, heavy duty drawer slides for the drawers that double as steps.
Once the drawers are installed, center the drawer faces within the face frame. Even stacks of playing cards are a great way to do this. In one case they are centered, reach over to the inside of the drawer and nail ane″ brad nails into the upper and lower corners of the drawer box, making sure to bulldoze the nails into the frame of the drawer confront. They volition exist further secured in one case the drawer hardware is installed.

Step 10 – Install Pegboard and Mattress Slats
Once the drawers are installed, the mattress slats and pegboard can exist installed. Attach three/iv″ square dowel cleats to the 2x2s to support the mattress slats. Brand sure they are iii/4″ down from the height of the 2x2s so that the 1×four slats are affluent with the tops of the 2x2s. Attach with 2″ wood screws.
If desired, install pegboard to the walls of the open up compartment for hanging storage. Using a brad nailer, nail a ane×2 to the top of the plywood panel (but under the meridian 2x2s) to act as a spacer for the pegboard. Install the pegboard with 1″ forest screws and washers.
Install the mattress slats approx. iii″ autonomously, drill pilot holes through the slats into the cleats, and so adhere with i one/4″ woods screws.

Step 11 – Install the Hinges and Hardware
Install the door hinges on the cabinets too as magnetic catches in the centers of the frames where the doors close. Install drawer and door hardware.


I could not be happier with how this bed turned out and my son absolutely LOVES information technology! He tin can't look to bear witness everyone that comes over his new storage bed, plus the hidden compartment underneath. He also couldn't wait to load upwards the pegboard with his Nerf gun arsenal. In that location's so much storage in this bed, which means we can finally get some of the things in his room under command, though he still won't permit me affect his stuffed animal collection.
If you'd like to build this Total Size Captain's Bed with storage, you lot can buy the printable plans, which include all of the details y'all demand including the materials list and cutting list.
If you need the twin size plans, you can find those Here.
If you lot'd like the plans to the matching dresser I built for him, yous tin can observe that here.
Likewise, don't forget to pin this to your project boards on Pinterest if you plan to build it afterward.

DISCLOSURE: I was provided product and compensation for this post. All ideas and opinions are 100% my own.
Source: https://addicted2diy.com/diy-storage-bed-with-a-hidden-storage-space/
0 Response to "Free Full Size 6 Drawer Platform Bed Plans"
Postar um comentário